Eye makeup that looks perfect in your bathroom mirror can look entirely different, and often worse, in photographs. This disconnect frustrates people during events, professional photoshoots, and everyday social media documentation.
The issue is not your makeup skills. It is that cameras and human eyes process light, color, and depth differently. Once you understand these differences, you can adjust your application to look as good on camera as you do in person.
How Cameras Change What You See
Flash Flattens Everything
Camera flash fires from a single point near the lens, hitting your face with flat, direct light. This eliminates the natural shadows that create depth on your face and in your eye makeup. Subtle crease definition disappears. A carefully blended gradient becomes a uniform wash.
The fix: increase the contrast in your eye makeup. Darken crease and outer corner shades by one to two levels beyond what looks right in the mirror. The flash will flatten these, bringing them back to what appears as normal depth in the image.
Cameras Mute Color
Camera sensors capture color differently than the human eye, and post-processing (whether automatic on a phone or manual in editing software) often shifts colors slightly. Warm tones can cool down. Muted colors can lose their character and read as grey or muddy.
The fix: increase color saturation by choosing shades one step more vivid than what you would normally select. If you would wear a muted mauve in person, try a slightly more saturated berry for photos. If you would wear champagne, try a richer gold.
Small Screens Lose Detail
Instagram, Zoom, and phone-sized images are tiny relative to real life. Fine detail work, subtle color transitions, and delicate liner disappear at small scale.
The fix: create your eye look with bold, clear shapes rather than subtle gradients. Wider liner, more defined crease lines, and clearer contrast between light and dark zones translate better to small-screen viewing.
Eyeshadow Finishes and How They Photograph
Matte
Matte shadows photograph the most predictably. They do not reflect light, so there are no hot spots or unexpected flashes in images. They provide consistent color that translates reliably from mirror to camera.
The downside: all-matte eye looks can appear flat in photos, lacking the dimension that makes eyes look alive. Use matte shadows for structure (crease, outer corner, transition) and add a non-matte accent for dimension.
Satin
Satin finishes are the sweet spot for photography. They have enough sheen to catch light and create dimension without producing the intense reflections that cause problems with flash. Satin shadows on the lid photograph as luminous and healthy.
Shimmer
Standard shimmer shadows photograph well in natural light and studio lighting where the light direction is controlled. Under flash, shimmer can create bright spots on the lid that draw attention away from the eye itself. The risk depends on the intensity of the shimmer. Fine, integrated shimmer is usually fine. Chunky or very reflective shimmer is more problematic.
Metallic and Foiled
Metallic finishes are high-risk under flash photography. The intense reflectivity can create a blown-out hot spot on the lid that appears as a white patch in the image. Under controlled studio lighting or natural light, metallics photograph beautifully, creating a rich, dimensional look.
If you know flash will be used, keep metallic finishes to small areas like the inner corner or the center of the lid, where a point of brightness reads as intentional rather than accidental.
Glitter
Large glitter particles scatter light in unpredictable directions under any lighting condition. In photographs, individual glitter particles can appear as bright, unfocused spots that look like artifacts rather than intentional makeup. Fine pressed glitter is less problematic than chunky loose glitter, but both are risky for formal photography.
Application Techniques for Photography
Increase Depth by 20-30%
The most universal photography makeup rule. Whatever looks right in the mirror, go slightly deeper, slightly more defined, and slightly more saturated for photos. A smokey eye that looks “perfect” in person will look “slightly dramatic” in photos, and “slightly dramatic” in photos is what reads as polished.
This is why professional makeup artists consistently push further than clients initially feel comfortable with. The camera absorbs intensity.
Define the Crease More Sharply
In person, a softly blended crease looks natural and elegant. On camera, that same soft crease can disappear entirely, making the eye look flat and undefined.
For photos, keep your crease shade slightly more concentrated and slightly less blended than you normally would. The edges should still be smooth, but the darkest point of the crease should be one shade deeper than your normal choice.
Line with Intention
Thin, precise liner translates better than smudged, soft liner in most photography contexts. The camera needs clear lines to register definition at the lash line. A smudged liner that looks sexy in person can read as smeared or messy on camera.
For flash photography specifically, a defined wing or a clean lash line creates a shape that the camera captures clearly. Practice getting a steady line that looks slightly heavier than what you would wear daily.
Highlight Strategically
Inner corner highlight and brow bone highlight serve double duty in photography. They catch light in ways that make the eyes appear brighter and more open. In photos, these highlights create focal points that draw the viewer’s eye.
Use a champagne or soft gold satin shadow for inner corner highlight. Avoid pure white or icy highlights, which can look harsh and unnatural in photographs.
Photography Type and Makeup Adjustment
Natural Light Photography
Natural light is the most forgiving condition for eye makeup. Colors read accurately, subtle techniques remain visible, and shimmer finishes look beautiful. This is the one scenario where what looks good in the mirror also looks good on camera with minimal adjustment.
For natural light, increase intensity by only about 10-15% over your normal application. Focus on even blending and clean edges.
Studio Photography
Studio lighting is controlled and directional, which means your makeup artist or photographer can adjust the light to complement your eye look. Studio settings favor well-structured eye looks with clear dimension.
Work with your photographer if possible. They can tell you whether the lighting setup favors warm or cool tones, and whether shimmer will be flattering or problematic with their specific equipment.
Flash Photography (Events, Parties, Prom)
Flash is the most challenging condition. Increase intensity by 25-30%. Use primarily matte and satin finishes. Define crease and liner more sharply than normal. Avoid very light shimmer on the browbone, which can flashback.
The single biggest flash photography concern for eye makeup is flashback from primers and base products containing silica or HD finishing powders. These ingredients reflect flash light as a white cast. Test your primer and setting powder with your phone flash before the event.
Phone and Selfie Photography
Phone cameras are closer to the face than professional cameras, which means more detail is visible. However, phone cameras also apply heavy automatic processing that smooths skin and adjusts colors.
For phone photography, the standard 20% intensity increase applies. Pay extra attention to under-eye concealer and inner corner highlight, as phone selfie cameras are positioned to catch these areas prominently.
Color Choices That Photograph Well
Universally Photogenic
- Warm browns and taupes: Look natural and photograph cleanly under all lighting conditions
- Bronze and copper: Catch light beautifully without creating harsh reflections
- Plum and burgundy: Read as rich and dimensional in photos, especially on brown and green eyes
- Champagne and gold: Ideal for inner corner and lid highlights
Challenging to Photograph
- Pure black: Can look harsh and flat in photos, absorbing light and creating a void. Dark brown or charcoal is often more photogenic for the same level of drama.
- Bright neons: Oversaturate in some camera sensors, creating an unnatural glow
- Very pale pastels: Disappear under flash, reading as bare
- Cool greys: Can photograph as muddy or dirty depending on the lighting
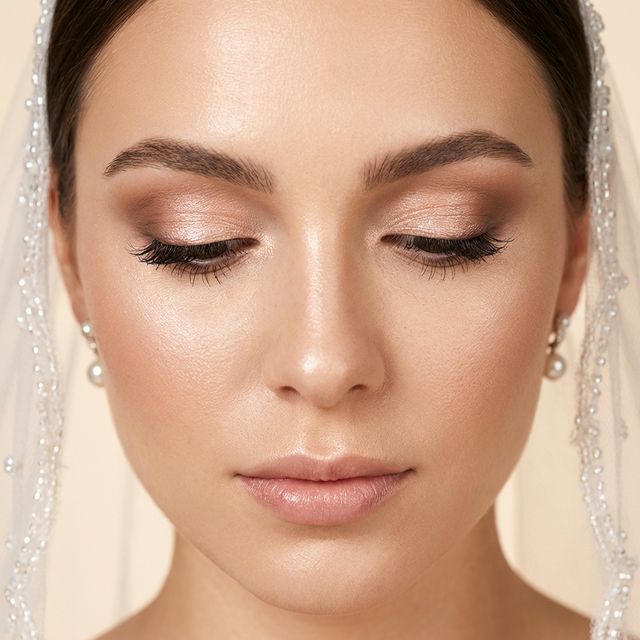
A Photo-Ready Eye Look
Here is a reliable eye look formula designed specifically for photography:
- Prime lids and set with powder
- Sweep a warm transition shade through the crease (one shade deeper than normal)
- Apply a satin or low-shimmer shade to the lid in champagne, bronze, or rose gold
- Define the crease with a clearly pigmented brown or warm-toned shade
- Darken the outer corner with a deep shade (espresso, dark plum, or charcoal)
- Line the upper lash line with black or dark brown liner in a clean, defined line
- Highlight the inner corner with champagne satin
- Apply two to three coats of volumizing mascara or false lashes
- Set with setting spray
This formula works under flash, natural light, and studio conditions because it covers all the bases: matte structure, satin dimension, clear definition, and strategic highlighting.
Testing Before the Event
For any important photography event, do a full test run. Apply your planned look, then take photos in multiple lighting conditions:
- Phone selfie with flash
- Phone photo in natural window light
- Phone photo under indoor artificial light
- Mirror selfie with overhead bathroom light
Compare the images. Identify where the look falls flat, where colors shift, and where definition disappears. Adjust for the actual event based on what you observe.
This ten-minute test eliminates surprises and lets you walk into the event confident that your makeup will photograph the way you intend.
Sources
- Bobbi Brown. (2025). “Makeup for Photography.” bobbibrown.com.
- Fashionista. (2026). “Why Makeup Looks Different in Photos and How to Fix It.” fashionista.com.
- MasterClass. (2025). “How to Apply Makeup for Photography.” masterclass.com.
Related Guides
Get weekly eye care & beauty tips
Expert-researched guides delivered to your inbox. No spam, ever.
Frequently Asked Questions
Why does my eye makeup look different in photos than in the mirror?
Cameras compress depth and flatten contrast compared to human vision. Colors appear less vibrant, shadows lose dimension, and subtle techniques like soft blending can disappear entirely. Flash adds another variable by washing out lighter colors and creating hot spots on reflective surfaces.
What eyeshadow finish looks best in photographs?
A combination of matte and satin finishes photographs most reliably. Matte shadows provide depth and structure that the camera can read, while satin finishes add dimension without creating distracting reflections. Avoid heavy glitter and very high-shimmer formulas under flash, which create hot spots.
Should I wear more makeup for professional photos?
Yes, typically 20-30% more intensity than what you would wear in person. Cameras flatten and mute makeup, so what looks slightly bold in a mirror often looks perfectly balanced on screen. This applies to both depth of shadow and intensity of liner.