Blending is the single skill that separates a polished eye look from a patchy one. The tools, motions, and sequencing all matter, here’s exactly how each technique works and when to use it.
Why Blending Matters More Than Color
Most beginner eye look failures come from placement, not color choice. A well-blended neutral look outperforms a patchy colorful one every time. Blending:
- Softens harsh edges between shades
- Diffuses color into the crease naturally
- Makes packing errors recoverable
- Creates the depth that gives an eye look dimension
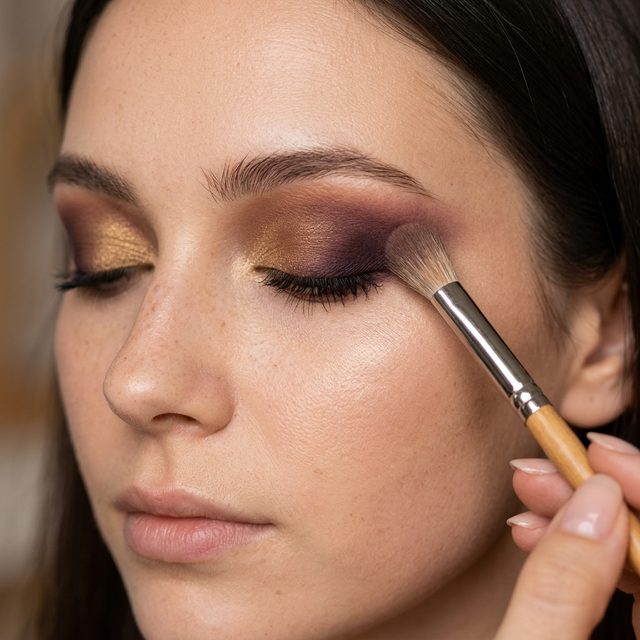
The Four Core Motions
1. Windshield Wiper (Back and Forth)
The foundational blending motion. Move a clean fluffy brush back and forth in a horizontal sweeping motion across the crease.
When to use: Blending transition shades into the crease. Starting the blending process on any look.
Brush type: Large fluffy dome brush (like Real Techniques Blend + Define, ~$10).
Technique: Keep the motion loose and quick. Slow movements deposit too much product in one spot. The brush should barely touch the skin, you’re moving air as much as bristles.
2. Circular Buff
Small, tight circular motions that work a shade into the skin.
When to use: Packing color onto the lid where you want intensity. Blending out the edges of a packed shade without moving the center color.
Brush type: Dense flat shader brush or a small fluffy brush.
Technique: Work from the outer edge of a shade inward. Small circles at the perimeter break up the hard edge without disturbing the packed center.
3. Stippling (Tap and Press)
Pressing (not dragging) the brush to deposit color precisely.
When to use: Adding shimmer shades to the center of the lid without smearing them into surrounding mattes. Placing inner corner highlight exactly.
Brush type: Flat paddle brush or fingertip for shimmer.
Technique: Load the brush, tap off excess, then press directly onto the target area. Lift straight up, no horizontal movement.
4. Diffuse Sweep
A light, barely-touching sweep across a large area to soften everything at once.
When to use: Final cleanup after blending. Softening any remaining harsh lines.
Brush type: The largest, most fluffy brush you have, a clean powder brush works.
Technique: Very light pressure, broad sweeping strokes over the entire eye area. Think of it as touching the surface color, not moving it.
The Correct Sequencing
Order matters as much as motion.
Standard sequence:
- Apply primer, let set 30 seconds
- Apply transition shade to the crease with the windshield wiper motion, blend first, before any lid color
- Pack lid color, blend edges with circular buff
- Deepen outer corner, blend inward with windshield wiper
- Add inner corner highlight by stippling
- Final diffuse sweep to soften everything
Why transition shade first: Applying a matte mid-tone to the crease before lid color gives you a pre-blended base to work into. It catches fallout and makes subsequent blending easier.
The Most Common Mistake: Too Much Product
The most common reason blending fails is overloaded brushes. When a brush has too much product, it deposits rather than blends, you’re adding color, not moving it.
Fix: Tap the brush on the back of your hand before every application. If you see a lot of powder come off, tap again. The working amount is almost always less than you think.
Blending Dry vs. Wet
Dry blending (powder on powder) is the default technique. The friction of dry bristles against dry product diffuses edges.
Wet blending is used for cream and liquid eyeshadows. Use either a damp brush or a brush set technique: apply the product with one brush and blend immediately with a second clean brush before it sets (most cream shadows give you 30–60 seconds).
Quick Reference: Brush Selection
| Job | Brush Type | Budget Pick |
|---|---|---|
| Transition blend | Large fluffy dome | Real Techniques Blend + Define (~$10) |
| Pack lid | Dense flat shader | e.l.f. Flat Shader (~$4) |
| Crease blend | Medium fluffy dome | Any budget set |
| Inner corner | Small pencil brush | e.l.f. Precision Brush (~$4) |
| Final soften | Oversized fluffy | Clean powder brush |
Fixing Blending Mistakes
Harsh line that won’t blend: Load a clean fluffy brush with the same transition shade and work back and forth over the line, adding a third color to bridge two shades is often faster than trying to blend the existing colors together.
Lid color migrated into crease: Stipple more lid color back onto the center and re-blend edges.
Everything looks muddy: The shades are too similar in value or you’ve blended so much they’ve merged. Redefine with a darker shade in the outer corner and a lighter one in the center to recreate contrast.
Related reads:
- Eyeshadow Placement Guide: Where Every Shade Goes
- Best Eyeshadow Brushes for Beginners
- How to Fix Eyeshadow Mistakes
Sources
- American Academy of Ophthalmology, Eye Health Information
- American Academy of Dermatology, Skin Care Guidelines
- National Eye Institute, Eye Health Research
Related Articles
- Smokey Eye Tutorial for Beginners
- Eyeshadow Blending Techniques
- Best Eyeshadow Palettes
- How to Make Eyes Look Bigger
- Eyebrow Shaping Guide
Frequently Asked Questions
How long does it take to get good at eye makeup? Most people see meaningful improvement within 2-4 weeks of daily practice. The key is practicing the same technique consistently rather than jumping between styles. Pick one look to master before moving on.
What’s the most important tool to invest in? A good blending brush is more impactful than any single eyeshadow product. Cheap brushes make even great eyeshadow look patchy and muddy. Look for dense, fluffy brushes in natural or synthetic fibers, brands like Real Techniques and EcoTools offer excellent quality under $20.
Should I apply eyeshadow before or after foundation? After foundation. Apply your eye makeup first if you prefer, this lets you clean up any fallout before finishing your base, but always set your eye area with primer and a light setting powder before starting eye makeup. This prevents creasing and extends wear.
Why does my eyeshadow fade or crease by midday? Without an eye primer, eyeshadow bonds to the natural oils in your skin rather than to the lid itself. Urban Decay Primer Potion, NYX Eyeshadow Base, and e.l.f. Eye Primer are all effective at extending wear to 8-10 hours.
Get weekly eye care & beauty tips
Expert-researched guides delivered to your inbox. No spam, ever.