Eyeshadow mistakes are normal, even professional makeup artists have sessions where one color goes too far or one side looks different than the other. The difference is knowing which mistakes are easily fixable and which ones require starting over (a shorter list than you’d think).
Mistake 1: The Shadow Went Too Dark
What happened: You layered one pass too many, or the shadow had more pigment than expected.
Fix:
- Take a clean, large fluffy brush and blend the edges out further, extend the shade into the transition area more softly
- Apply a light to medium neutral matte (taupe, beige, or soft champagne) over the darkest area using a soft pressing motion, not swiping
- Blend again once the lighter shade is applied
- If it’s still too dark, repeat: press neutral matte, blend out
What doesn’t help: Using a damp cotton swab or adding more shimmer, these either remove too much or create patchy shine over a dark base.
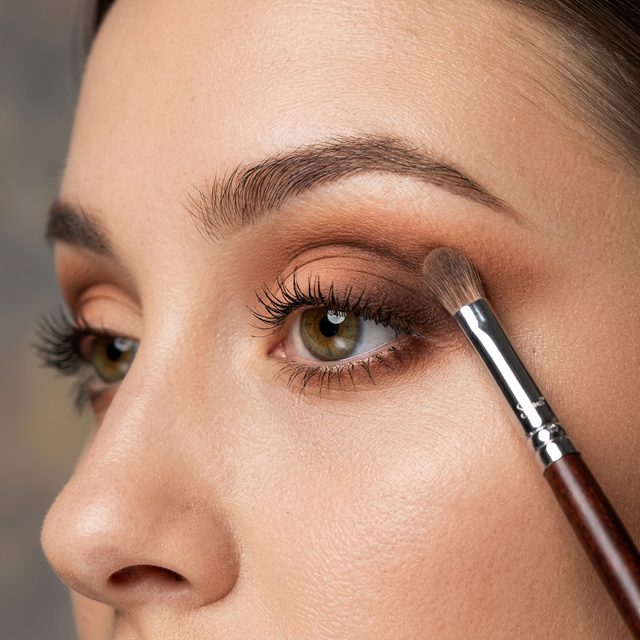
Mistake 2: Harsh or Unblended Edges
What happened: There’s a visible line where one shadow ends and another begins instead of a soft gradient.
Fix:
- Use a clean, fluffy brush (no product on it) and use small circular or windshield-wiper motions right along the edge
- If that’s not enough, apply a tiny amount of a mid-tone matte shade that sits between the two colors and blend it bridge the gap
- The goal is to create a third tone that transitions between the two original shades
Key insight: Most blending problems are solved by more blending with a clean brush, not by adding more product. Product = more pigment = potentially more obvious lines.
Mistake 3: Fallout Under the Eyes
What happened: Powder shadow (especially shimmers) dropped onto the under-eye area or cheeks during application.
Fix A (before it’s settled): Use a clean dry sponge or a dry fluffy brush to gently press the fallout off the skin without sweeping, sweeping drags the pigment and can spread or embed it.
Fix B (after it’s been pressed in): Dust a light setting powder over the area to “lock” what’s there (prevents smearing), then use a damp-tipped concealer brush or damp sponge with concealer to cover and blend.
Prevention for future looks: Apply a loose setting powder under the eyes before starting eye makeup as a “catch powder.” When you’re done with your eyes, sweep it off with a brush and all the fallout comes with it.
Mistake 4: Creasing Mid-Application
What happened: Shadow has already collected in the fold of the lid, creating a line.
Fix:
- Use a clean small brush to very gently sweep the crease line outward and upward, dispersing the collected pigment
- Press a small amount of setting powder directly into the crease area
- Reapply a small amount of your crease color with a light hand, working above the problem area
If it persists: The lid needs primer. Blot the lid with a blotting paper, apply primer from your kit, let set, and re-apply shadow. The crease will continue to return without primer if your skin is oily.
Mistake 5: Uneven Eyes, One Side Looks Different
What happened: Your two eyes look notably different. This is one of the most common and most panic-inducing mistakes.
Fix:
- Hold a mirror at arm’s length and identify which eye’s look you prefer, the “correct” one
- Cover the “correct” eye and study what’s different about the “off” eye
- Adjust the “off” eye specifically: go one step at a time
- Resist the urge to touch the “correct” eye to try to match it down, you’ll usually make it worse
Reality check: From the front at conversational distance, small asymmetries (within a centimeter or so) are rarely noticeable to anyone but yourself. Your face is naturally asymmetrical. Precision that looks imperfect up close almost always reads as balanced from several feet away.
Mistake 6: Liner Went Wonky
What happened: The liner line is thicker on one side, crooked, or the wing angle is wrong.
Fix A (quick correct): Dip a cotton swab in oil-free eye makeup remover and use the tip to erase the specific error, cleaning up the edge or removing the wing to redraw.
Fix B (wing too thick): Clean the outer edge of the wing with a remover-dampened swab, redraw the edge with a clean line, let dry, then apply a matte shadow slightly over the edge to blend and sharpen.
Fix C (shape is wrong): Remove the wing entirely with a swab, redraw from scratch. It’s faster than trying to correct the wrong angle, especially with pencil liner, which re-applies quickly.
Mistake 7: Too Much Glitter/Shimmer, Looks Chunky or Overpowering
What happened: The shimmer or glitter feels too heavy or chunky for the look you’re going for.
Fix:
- Press a matte neutral shadow on top of the shimmer with a flat brush, this tones down the glitter without removing it entirely
- Use a piece of tape (gently pressed and lifted) to pick up excess loose glitter
- If the glitter has migrated under the eye: dry sponge press as above
Mistake 8: You Want to Start Over (When That’s the Right Choice)
Some situations are genuinely faster to reset from scratch:
- The entire look is patchy or unblended across both eyes
- Wrong color family entirely (e.g. applied smoky look when you wanted a soft natural)
- Heavy cream or liquid shadow dried in the wrong place
In these cases: saturate a cotton pad with micellar water, hold against the eye for 15 seconds, wipe off. Start with clean skin. It genuinely takes less time than trying to work over a fundamentally wrong base.
Sources
- Into the Gloss. (2025). “How to Fix Makeup Mistakes, According to Makeup Artists.” intothegloss.com.
- Brown, Bobbi. Bobbi Brown Makeup Manual. Grand Central, 2008 — correction techniques and product removal methodology
- Sali Hughes. (2022). Pretty Iconic: A Personal Look at the Beauty Products that Changed the World. 4th Estate.
Related Guides
- How to Stop Eyeshadow from Creasing
- Eyeshadow Brush Guide: Every Brush Type Explained
- How to Remove Eye Makeup Safely
We evaluate beauty products and techniques independently. To learn more about our editorial standards, read our Editorial Policy.
Get weekly eye care & beauty tips
Expert-researched guides delivered to your inbox. No spam, ever.
Frequently Asked Questions
How do I fix eyeshadow that's too dark without removing it?
Use a clean, fluffy brush to blend the edges out further. Then layer a lighter, neutral matte shadow over the darkest areas using a soft pressing motion — this diffuses and lightens without fully removing. The key is using a matte (not shimmer) lightener so you don't create patchy shine.
How do you fix fallout under the eyes?
The quickest fix is a clean, dry makeup sponge: press (don't sweep) it gently under the eye to lift fallout particles without smearing. For fallout that's already been pressed into foundation or concealer, apply setting powder over the area to lock in what's there, then correct with concealer on top.
How do I fix uneven eye shadow? One eye looks different than the other.
First, identify exactly which eye is 'wrong' by covering each one and viewing the other. Then recreate the look on the 'off' eye rather than trying to adjust the 'correct' one. Make one change at a time and step back between each application to check symmetry.