Eyeliner is one of the most versatile tools in makeup, the same eye can look dramatically different depending on style, placement, and thickness. This guide covers every major eyeliner style, when to use each, and how to execute them cleanly.
The Classic Winged Liner
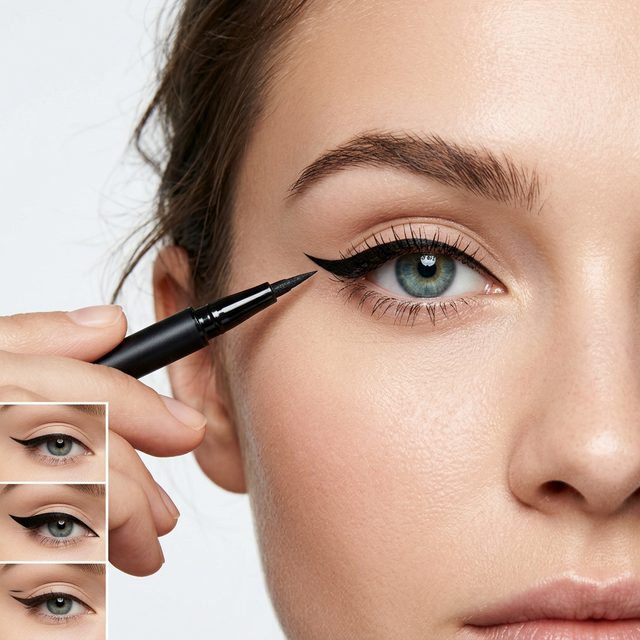
The wing is the most requested eyeliner style. The goal is an upward extension from the outer corner that lifts rather than drags the eye.
How to execute:
- Draw the wing first, a short diagonal stroke from the outer corner angling upward toward your brow tail. The angle should follow the lower lash line extended outward.
- Connect the wing down to the lash line with a thin line
- Fill in along the upper lash line from inner to outer corner
- Make the line thickest at the outer third, thinnest at the inner corner
Eye shape adjustments:
- Hooded eyes: Keep the wing visible above the hood, draw with eyes open, not closed
- Downturned eyes: Angle the wing steeply upward to counteract the droop
- Round eyes: Elongate the wing further outward to add length
- Almond eyes: Any wing style works, this is the most forgiving shape
Best tools: Felt-tip liquid liner (most control), angled brush + gel liner (most precision)
Cat Eye
The cat eye is an extended winged liner that also lines the lower lash line, creating an elongated, feline effect.
How to execute:
- Complete a classic wing (see above)
- Line the outer third of the lower lash line, connecting it to the wing point
- Leave the inner lower lash line unlined, this keeps the eye open at the inner corner
- Optional: small flick upward at the outer lower corner
Key detail: The upper and lower lines should meet at a clean point at the outer corner, not leave a gap.
Tightlining
Tightlining is applying liner between the lashes on the upper waterline, the rim of skin between your upper lashes and your eyeball. The effect is denser-looking lashes with no visible liner gap.
How to execute:
- Tilt your head back, look downward
- Lift your upper eyelid slightly with your non-dominant hand
- Apply a pencil or gel liner in short back-and-forth strokes along the inner rim, the waterline between the lashes and the eye
- Work in sections from inner to outer corner
Best products: Kohl or kajal pencils (softer formula works better in this area). Avoid waterproof liquid liner, too harsh for the waterline.
Effect: Makes lashes look naturally thicker. Invisible liner that enhances without adding an obvious “liner” look.
Smudged / Smoky Liner
Smudged liner creates a soft, diffused edge rather than a clean line. It’s faster than a full smoky eye but gives a similar intensity.
How to execute:
- Apply a pencil liner close to the upper lash line
- Immediately smudge with a small smudge brush, cotton swab, or your fingertip, working quickly before it sets
- Apply the same to the lower lash line and smudge downward
- Optional: pat a dark matte eyeshadow over the smudged line to intensify and set
Key tip: Speed matters. Smudge within 10 seconds of application, most pencils set within 30–60 seconds.
Floating / Graphic Liner
Graphic liner places liner above the crease or in geometric patterns, disconnected from the lash line. It’s the defining look of the 2026 cyber-sigilism and editorial trends.
How to execute:
- Use a felt-tip liner with a fine tip for clean lines
- Draw your design lightly with an eye pencil first (guides can be wiped off)
- Trace with liquid liner and let dry completely before opening the eye
- Common formats: floating line above crease, geometric corner accents, connected dots
Eye shape considerations: Floating liner works on all shapes, adjust placement to balance your features. On hooded eyes, place the floating line higher so it remains visible.
Waterline Liner
Lining the lower waterline (the inner rim of the lower lid) creates different effects depending on color:
- White or nude liner: Makes eyes appear larger, reduces redness. Best for tired-looking eyes.
- Black or dark liner: Makes eyes appear smaller and more intense. Works well for drama.
- Champagne or gold: Brightens without the stark contrast of white.
Application: Use a smooth pencil with a soft formula. Firm the lower lid gently and apply in quick back-and-forth strokes.
Double Liner
Multiple liner lines stacked or layered for editorial effect.
Common executions:
- Two parallel lines above the lash line in different colors
- A thin colored liner above or below a black wing
- A graphic line paired with a standard lash-line application
Best for: Editorial shoots, night events, bold looks where the eye is the clear focal point.
Choosing Your Liner Format
| Style | Best Format | Why |
|---|---|---|
| Winged liner | Felt-tip liquid | Precision, no wobble |
| Cat eye | Felt-tip or brush | Clean point at corner |
| Tightlining | Soft pencil/kohl | Softer, waterline-safe |
| Smudged | Pencil + smudge brush | Ease of blending |
| Graphic | Fine felt-tip | Ultra-precise lines |
| Waterline | Pencil (waterproof) | Won’t migrate into eye |
| Double liner | Both | Depends on the colors used |
Common Mistakes
Pulling the skin to apply: Distorts the line when you release. Keep skin neutral and use short strokes instead.
Drawing in one long stroke: Causes wobble. Build the line in 2–3 shorter strokes and connect them.
Starting at the inner corner: Makes the inner end thicker than intended. Start closer to center and work outward, then fill in.
Applying to moving eyes: Look directly into the mirror, not downward, for upper liner.
Related reads:
- How to Make Eyes Look Bigger with Eyeliner
- Graphic Eyeliner Looks: 6 Styles to Try
- Cut Crease Tutorial: Step by Step
Sources
- American Academy of Ophthalmology, Eye Health Information
- American Academy of Dermatology, Skin Care Guidelines
- National Eye Institute, Eye Health Research
Related Articles
- Smokey Eye Tutorial for Beginners
- Eyeshadow Blending Techniques
- Best Eyeshadow Palettes
- How to Make Eyes Look Bigger
- Eyebrow Shaping Guide
We evaluate beauty products and techniques independently. To learn more about our editorial standards, read our Editorial Policy.
Get weekly eye care & beauty tips
Expert-researched guides delivered to your inbox. No spam, ever.